3D Modeling for 3D Printing — Files Your Printer Will Actually Accept
This page is about 3D modeling for 3D printing as a service — what we model, how we prepare the file, and where we deliberately stop. It is not another encyclopedia entry on additive manufacturing. If you already own a printer or you are paying a print bureau to run the job, the only thing standing between you and a usable part is a model that obeys the rules of the process. That is the piece we handle.
Most printable failures are not artistic. They are geometric. A wall that is 0.3 mm thinner than the nozzle can resolve. A mesh that looks closed in the viewport but contains six non-manifold edges. A supports tree that nobody planned for, attached to the visible face of a character’s cheek. We deal with these issues during modeling so the slicer does not have to argue with the file.
What We Actually Deliver
Art Land Design has been a 3D studio for over 2 decades and has shipped 1,500+ projects across visualization, drafting, animation, and modeling. 3D modeling for 3D printing is a secondary service — not the bulk of our work, but a service we take on regularly when the brief is design-led. The categories below cover what we routinely model for print.
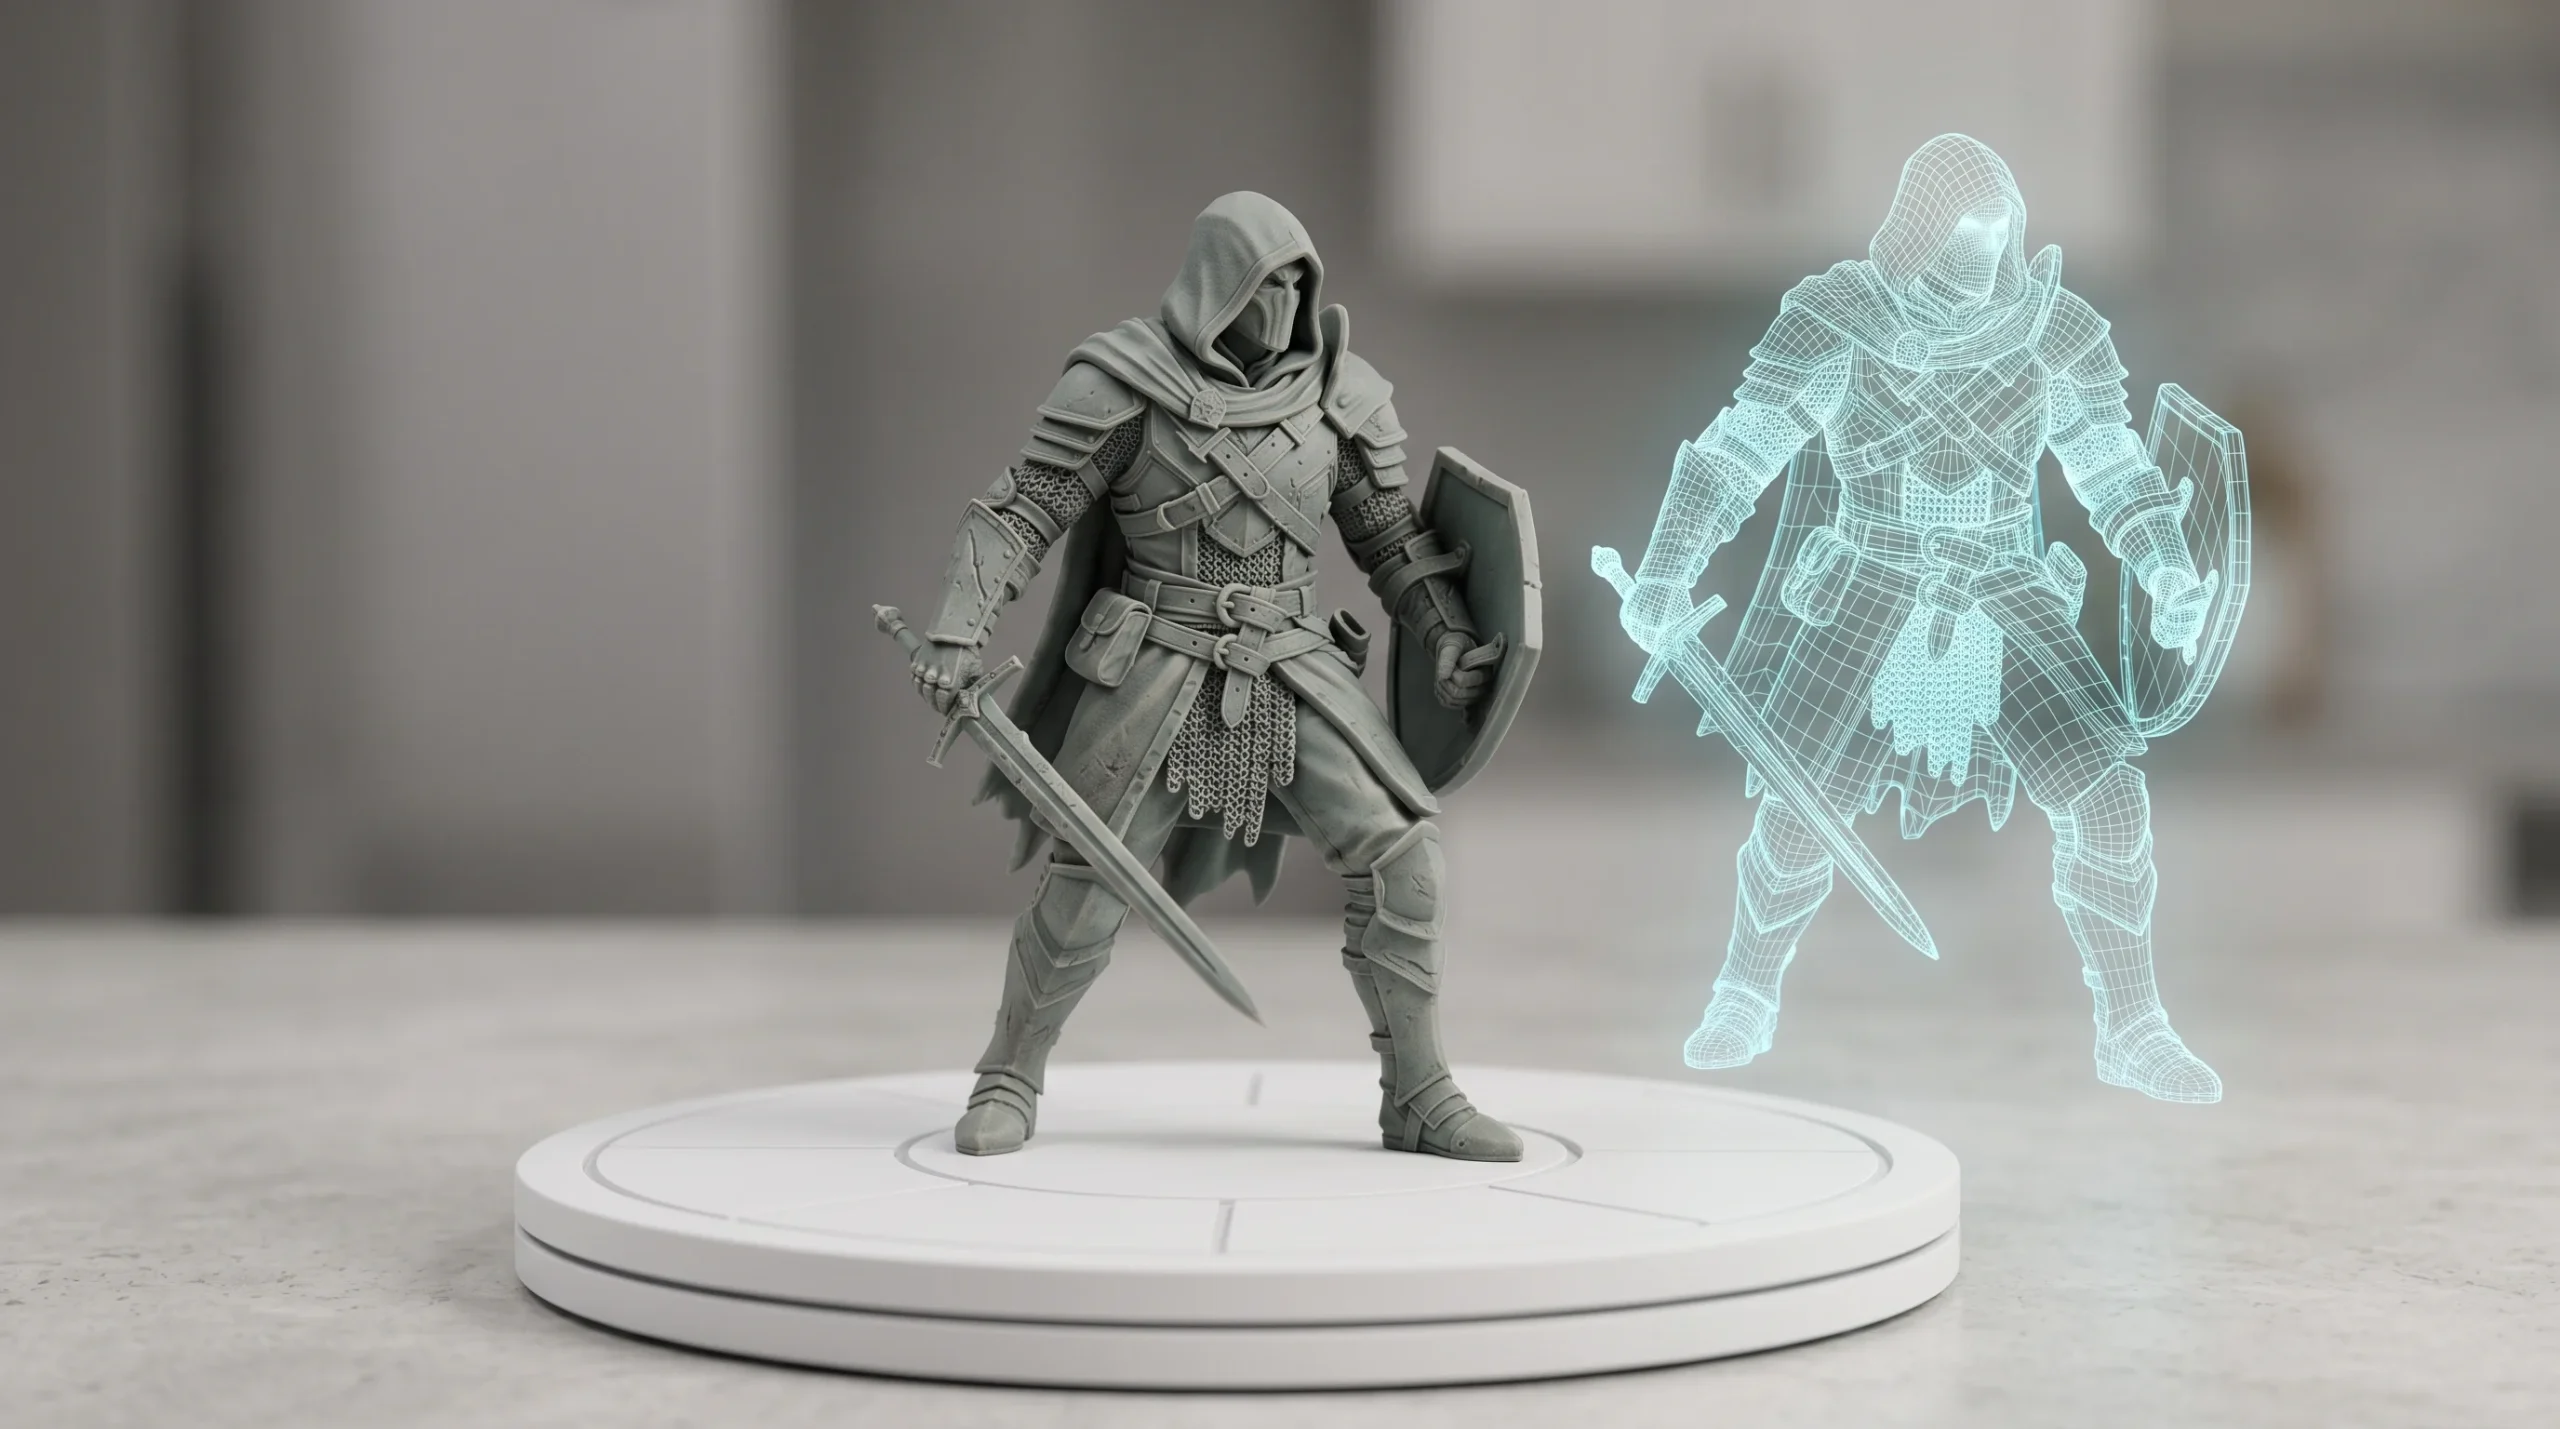
- Characters and figures. Stylized or realistic, sculpted in ZBrush, retopologized where needed, hollowed for resin, oriented to minimize visible support scars. We handle hair, drapery, weapon props, and base plates.
- Decorative items. Vases, lamp shades, ornamental panels, lattice geometry, wall reliefs, custom housewares. Designed with print-method realities in mind — FDM versus SLA versus SLS produce very different surface characters and we model accordingly.
- Prototype geometry. Concept enclosures, demonstrator housings, fit-check shells, ergonomic mock-ups. Useful when an industrial designer needs a tangible object in their hand before signing off on a CAD release.
- Custom miniatures and tabletop pieces. Game-scale figures, terrain, modular kit parts, base inserts.
- Architectural massing models. Building studies, site dioramas, presentation pieces — modeled at the scale you intend to print, with walls thickened so the result survives handling.
- One-off design objects. Bespoke pieces — trophies, gift items, branded display props, sculptural studies — where the client supplies the concept and we produce the printable mesh.
Output is normally STL or OBJ, with 3MF when the project benefits from embedded color or part-group information. We deliver a single watertight mesh per part, oriented for print, sized in millimeters, and free of the geometry the slicer will choke on. When the print bureau prefers a particular orientation or support strategy, we hand the file off in that posture.
How We Prepare a Print-Ready File
The workflow is short on theatre and long on small decisions. A rough version of how the work moves through the studio:
- Brief and reference. What is the object, what is the print method (FDM, SLA, SLS, MJF, DMLS), what is the target print size, and which printer or service is running the job? Without those four pieces, modeling for print is guessing.
- Concept or sculpt. Organic forms go through ZBrush. Hard-surface or technical forms get built in 3ds Max, Blender, or SolidWorks depending on what the geometry needs. We model at the final size in real units.
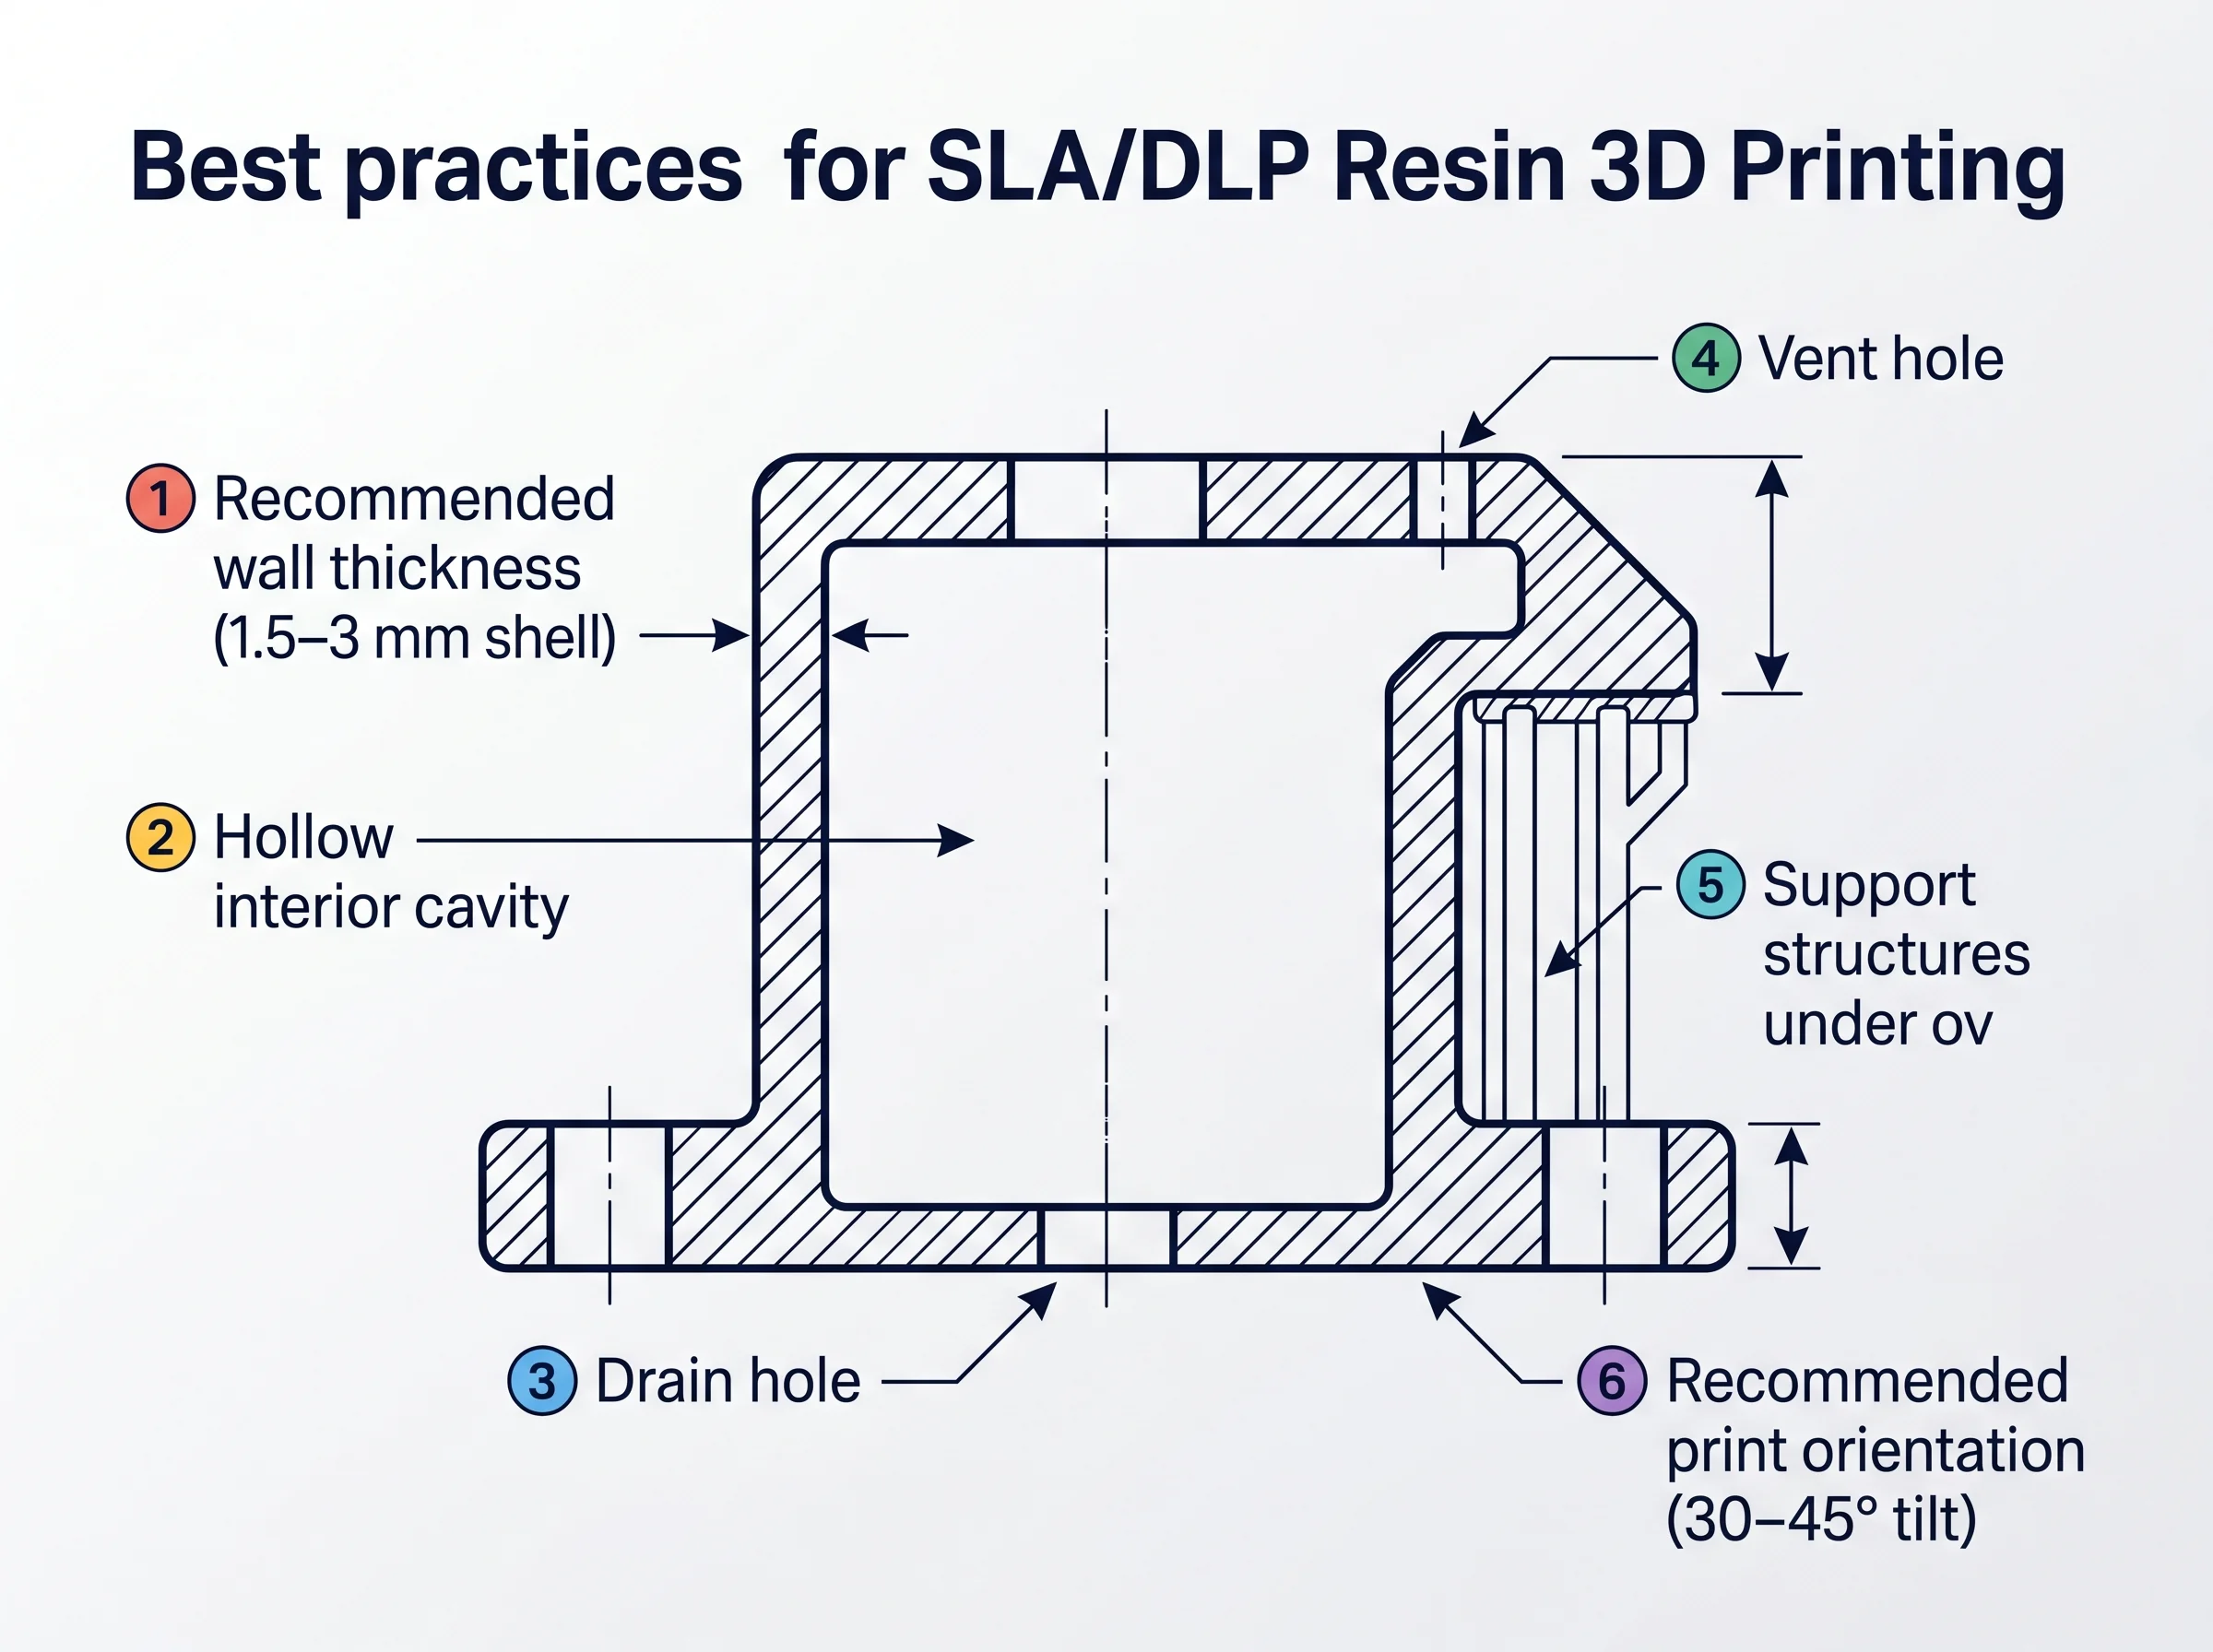
- Print-rule pass. Wall thicknesses checked against the printer’s minimum feature size. Overhangs reviewed for support needs. Tiny floating details thickened or fused. Sharp internal corners softened where the resin or filament will pool or fail to fuse.
- Watertight cleanup. Non-manifold edges, flipped normals, internal faces, and overlapping geometry all removed. We run the file through mesh-analysis tooling and resolve whatever it flags. A model that looks sealed is not the same as a model that is sealed.
- Hollow and drain (when applicable). Resin parts are hollowed to save material and avoid suction cups during peel. Drain holes are placed where they will not ruin the visible surface.
- Split and key. Large parts get split into printer-bed-sized chunks with locating keys or dovetails that survive assembly. We do this in CAD, not after the fact in the slicer.
- Export and handoff. Final mesh exported, file-checked again, delivered with notes about scale, recommended orientation, and any parts that need particular care.
Half the value of this service is that we have already lost the arguments you would otherwise have with your slicer. We know which thin tab will warp. We know which detail will disappear at 0.05 mm layer height on an entry-level resin machine. We model around those realities up front.
Where We Draw the Line
Honest scope boundaries — the firm exclusions matter as much as the inclusions.
- We do design-side modeling, not production engineering. If the project is a precision industrial mechanism, a tooling insert, a load-bearing functional part, or a regulated medical/aerospace component, that is an engineering job, not a modeling job. The discipline required — tolerances, material selection, certified geometry, GD&T — is a different practice.
- We will undertake technical work if you supply the engineering. When a client arrives with clear CAD references, stamped drawings, or detailed specs and only needs the geometry translated or cleaned for print, we are happy to do the modeling translation. We just do not own the engineering responsibility.
- No certification, no regulatory sign-off. Medical devices, FAA-relevant aerospace parts, structural components — outside scope. We will model a demonstrator. We will not represent it as production hardware.
- We do not run the printer. Art Land Design is a modeling studio. We do not operate a print farm. We will collaborate with the bureau or in-house team that runs your job, and we will tune the file to their machine, but the print itself is theirs to execute.
The rule of thumb: if the object’s success depends mostly on form, fit, and visual character, we are the right studio. If it depends on certified engineering, we are not, and we will say so before invoices start.
Who This Is For
- Product designers and industrial designers. You have a concept in sketches or rough CAD and you need a clean, printable file for a demonstrator, an ergonomic study, or a stakeholder review. We turn the idea into a mesh that prints first time on the bureau’s machine.
- Marketing and creative teams. Custom display props, branded objects, exhibition pieces, awards. You need something physical that matches the brief and survives the run. We model it so the printer does not introduce surprises.
- Tabletop and collectibles publishers. Character files, terrain pieces, accessory kits. Files prepared with FDM-versus-resin in mind, with the layer-line and support-mark conversation already handled.
- Architectural and developer teams using physical study models. When a presentation calls for a touchable massing model, we build it scaled, hollowed where appropriate, and split into bed-sized parts that align cleanly when glued.
- Individual buyers commissioning one-off pieces. Custom sculptures, gifts, memorial objects, replica props. We handle the modeling; you arrange the print.
- Agencies subcontracting. Most of the work we have shipped over the last decade reached the end client through intermediary firms. We can quietly sit behind your studio name if that is the cleanest arrangement.
Most clients arrive with a rough idea and end up needing a few rounds of revision before the file is approved. That is normal. Serious projects always have some change orders, and a printable model is no exception — the silhouette gets adjusted, a detail gets thickened, a base gets resized. We plan for that rather than pretending it will not happen.
Software We Use
Tooling matters because it changes what we can do cleanly. The studio’s stack for print-ready modeling, with a short note on why each tool is in the rotation:
- ZBrush. Our primary tool for organic and sculptural work — characters, figures, ornamentation, anything where surface character is the point. ZBrush gives us the resolution to carve detail that survives both screen review and the printer.
- Blender. Modeling, retopology, mesh repair, and the cleanup pass. Blender’s modifier stack and mesh-analysis tools make watertight prep predictable.
- 3ds Max. Hard-surface modeling, assembly work, and any case where we are also producing renders of the same object alongside the printable file. The two pipelines share geometry naturally.
- SolidWorks. Reserved for the more technical end — when the brief involves precise dimensions, mating surfaces, or parametric features that a sculpting tool would fight. We use it selectively, where the work needs CAD discipline rather than artistic freedom.
- Mesh-analysis and repair tools. Run on every file before delivery — non-manifold detection, wall-thickness checks, intersection cleanup. These are not glamorous but they are the difference between a file that prints and a file that wastes resin.
Most projects use two of these tools, not all five. ZBrush plus Blender for organic work. 3ds Max plus SolidWorks for hard-surface and technical. The combination is chosen by the geometry, not by habit.
Where 3D Printing Modeling Sits in the Studio
This service shares a pipeline with the studio’s other 3D work. The same models we build for print are often relatives of the assets we render, animate, or push into a 3D product visualization deliverable. If a brief calls for a printable prototype and marketing imagery, we can produce both from a single base mesh — usually a meaningful saving versus modeling the same object twice. The same logic applies to 3D product animation when you want the part to move on screen before it moves in real life. For teams who want to see how a single 3D pipeline serves visualization, animation, and physical output together, our 3D solutions overview walks through the broader picture.
The studio’s centre of gravity remains architectural visualization, drafting, and product CGI. 3D printing modeling is a service we take seriously when it shows up — not a service we lead with on the home page.